How to: Export a Scene to an XML File.
One of the common tasks performed by KitchenDraw plugins is exporting a scene to some particular format. This allows to pass data to other programs, like ERP, CRM systems, or accounting software.
This tutorial explains how to create a plugin that exports a scene to an XML file like this:
<Scene FilenameWithPath="Q:\is90mob\Scenes\346B3736_0003_01.scn">
  <Customer Company="SampleCompany" Name="HUDSON" FirstName="Mary" />
  <Object Number="" Type="TechnicalSymbol" Catalog="@symcuf1" KeyReference="P10a" Handing="None">
    <Name>Socket 10A </Name>
  </Object>
  <Object Number="7" Type="Standard" Catalog="@PM_CUIS" KeyReference="BE80" Handing="None">
    <Name>Sink unit 2D</Name>
    <Finish Type="Front model" Code="08_2" Name="Wood frame and lacquered panel" />
    <Finish Type="Front colour" Code="HB" Name="beech / blue" />
    <Finish Type="Carcase colour" Code="HE" Name="beech" />
    <Finish Type="Handles" Code="H2" Name="H2" />
  </Object>
  <Object Number="" Type="Linear" Catalog="@PM_CUIS" KeyReference="S" Handing="None">
    <Name>Plinth</Name>
    <Finish Type="Plinths colour" Code="HE" Name="beech" />
  </Object>
</Scene>
Though the format itself is probably too limited to be really useful, the approach demonstrated here may be expanded easily to fit your particular needs.
Basic Approach
Create a new plugin project and configure it
Create a new Class Library (.NET Framework) project.
Add a reference to the KD.SDK2.dll assembly.
- In Solution Explorer, right click the References node and click Add Reference.
- In the Add Reference dialog box, select the Browse tab.
- In the bottom the the dialog box, press Browse button.
- In the appeared dialog box locate the KD.SDK2.dll in the folder of your KitchenDraw / InSitu installation. Then press OK.
In the Plugin.cs file, define the
Pluginclass like following:using System; using KD.SDK2; namespace ExportSceneToXmlPlugin { public class Plugin { Appli _appli; public Plugin() { _appli = new Appli(); } public bool OnPluginLoad(int unused) { return true; } public bool OnPluginUnload(int unused) { return true; } } }Note
Namespace in your file should be the same as the name of your assembly, without the .dll extension and a path.
Configure project build options:
Set Platform Target to x86.
In the Debugging tab, configure Start Action to run your KitchenDraw / InSitu executable.
Set Enable native code debugging on.
More details on creating and configuring a plugin project you can find in the Hello, World! walkthrough.
Add a custom menu item to the File > Export menu
Add
Appli.MenuItem _myMenuItemfield to the Plugin class:public class Plugin { //... Appli.MenuItem _myMenuItem; //...Add
OnMyMenuItempublic method to thePluginclass:public class Plugin { //... public bool OnMyMenuItem(int unused) { return true; } }This method will be called when your custom menu item is activated.
Tip
You can use any other name for this method. Just ensure that you pass the same name to the Appli.InsertMenuItem call (below).
To register your custom menu item, add the following code to the
OnPluginLoadmethod of thePluginclass:public bool OnPluginLoad(int unused) { var menuInfo = new Appli.MenuItemInsertionInfo(); menuInfo.Text = "Custom file by plugin (.XML)..."; menuInfo.DllFilenameWithoutPath = System.IO.Path.GetFileName(System.Reflection.Assembly.GetExecutingAssembly().Location); menuInfo.ClassName = nameof(Plugin); menuInfo.MethodName = nameof(OnMyMenuItem); _myMenuItem = _appli.InsertMenuItem(menuInfo, Appli.MenuItem.StandardId.File_ExportBmp); return true; }Notice that export-related items are usually placed in the File > Export menu in KitchenDraw / InSitu. In this particular case, the menu item will be placed before File > Export > Image standard menu item, as it's stated in the Appli.InsertMenuItem call above.
Add the following code to the
OnPluginUnloadmethod:public bool OnPluginUnload(int unused) { _appli.RemoveMenuItem(_myMenuItem); return true; }The plugin can be unloaded at any moment via menu ? > Service > Plugin Manager. This code ensures that when the plugin unloaded, its custom menu item gets removed as well.
Implement your custom export
Add a reference to the System.Xml assembly.
- In Solution Explorer, right click the References node and click Add Reference.
- In the Add Reference dialog box, select the Assemblies tab.
- Check System.Xml assembly in the list. Press OK.
Add
using System.Xml;directive in the top of the fileusing System.Xml;In the
OnMyMenuItemmethod, obtain the Scene class instance from the_appli:public bool OnMyMenuItem(int unused) { Scene scene = _appli.Scene;The instance of Scene class allows you to read the content of a scene that is currently open (e.g. objects, view points, generic finishes, headings,...).
Create a new
XmlDocumentinstance to perform XML forming, and create a root node for your XML file:var xmlDocument = new XmlDocument(); var sceneXmlElement = xmlDocument.CreateElement("Scene"); xmlDocument.AppendChild(sceneXmlElement);Fill in the scene filename. The filename can be obtained from the corresponding property of Scene class, just like most other information at the entire-scene level:
sceneXmlElement.SetAttribute("FilenameWithPath", scene.FilenameWithPath);Write information about the customer. It can be obtained from the special Scene.KeywordInfo property, which provides a huge amount of information in a form convenient for generating reports:
        var customerXmlElement = xmlDocument.CreateElement("Customer");
        sceneXmlElement.AppendChild(customerXmlElement);

        customerXmlElement.SetAttribute("Company",
                                        scene.KeywordInfo["@Base.CustomerCompany()"]);
        customerXmlElement.SetAttribute("Name",
                                        scene.KeywordInfo["@Base.CustomerName()"]);
        customerXmlElement.SetAttribute("FirstName",
                                        scene.KeywordInfo["@Base.CustomerFirstName()"]);
The complete list of keywords can be queried from KeywordInfo can be found at the Personalizing the Word documents site section.
Create a loop to iterate through the scene's objects to export each of them:
        foreach (Scene.Object obj in scene.Objects)
        {
            //...
In the loop, create an
XmlElementinstance to write the object information:var objXmlElement = xmlDocument.CreateElement("Object"); sceneXmlElement.AppendChild(objXmlElement);Fill in the object element's attributes:
            objXmlElement.SetAttribute("Number", obj.Number);
            objXmlElement.SetAttribute("Type", obj.Type.ToString());
            objXmlElement.SetAttribute("Catalog", obj.CatalogFilename.ToString());
            objXmlElement.SetAttribute("KeyReference", obj.KeyReference);
            objXmlElement.SetAttribute("Handing", obj.Handing.ToString());
Create "Name" XML element, and fill it in:
            var nameXmlElement = xmlDocument.CreateElement("Name");
            objXmlElement.AppendChild(nameXmlElement);

            nameXmlElement.InnerText = obj.Name;
Now, write the object's supplier comment to the XML, if one exists:
            if (obj.SupplierComment != string.Empty)
            {
                var supplierCommentXmlElement = xmlDocument.CreateElement("SupplierComment");
                objXmlElement.AppendChild(supplierCommentXmlElement);

                supplierCommentXmlElement.InnerText = obj.FitterComment;
            }
And, finally, export the object's finishes:
- Get the object's finishes config:
var objFinishesConfig = obj.GetFinishesConfig();- Now, iterate through the finishes to write each to a separate XML element:
foreach(var finish in objFinishesConfig.Finishes) {- For each finish, create and fill appropriate XML element:
                var finishXmlElement = xmlDocument.CreateElement("Finish");
                objXmlElement.AppendChild(finishXmlElement);

                finishXmlElement.SetAttribute("Type", finish.Type.Name);
                finishXmlElement.SetAttribute("Code", finish.Code);
                finishXmlElement.SetAttribute("Name", finish.Name);
In the end of the
OnMyMenuItemmethod, insert the code to save formed XML to a file:- First, determine the filename for the XML file. In this example, you will save the xml file in the:
string xmlFilename = Path.ChangeExtension(scene.FilenameWithPath, ".xml");For real-life scenarios, you will usually allow user to choose filename, using either
System.Windows.Forms.SaveFileDialogorMicrosoft.Win32.SaveFileDialog(for WPF).- Now, call
XmlDocument.Savemethod to write a file:
xmlDocument.Save(xmlFilename);
Advanced topics
How to handle errors
While the code above is sufficient to export an XML file, it does not contain any exception handling. Since errors (and thus exceptions) can occur even in such a straightforward scenario like one described here, you should always consider some exception handling strategy.
While the KitchenDraw plugin subsystem does some basic exception handling itself, it does it mostly to ensure that the plugin failure will not crash the entire application. When your plugin throws an exception, for example, due to lack of ability to write a file, the KitchenDraw application will catch an exception and display its details in a message box like this:
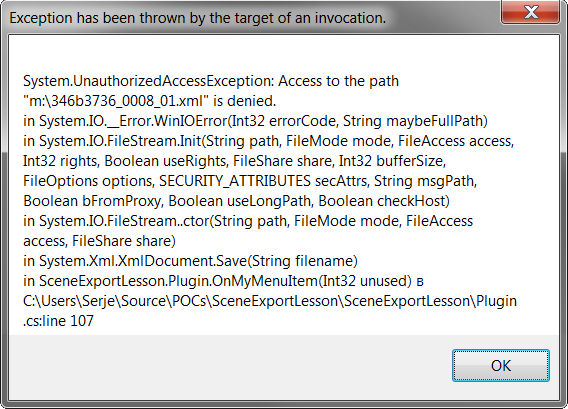
To provide more comprehensive error handling, you should catch exceptions in your code by yourself. The following sample shows you how to do this.
Set some basic exception handing in the scope of entire method:
In the top of the
OnMyMenuItemmethod, create atry ... catch(...) ...block.Move all the previously existing code inside the
tryblock, except of thereturn truestatement.Define error handing code in the
catchblock.
    public bool OnMyMenuItem(int unused)
    {
        try
        {
            Scene scene = _appli.Scene;

            var xmlDocument = new XmlDocument();

            // ... all the rest of existing code ...

            xmlDocument.Save(xmlFilename);
        }
        catch(Exception)
        {
            System.Windows.Forms.MessageBox.Show("Failed to generate XML file");
            return false;
        }

        return true;
    }
* You should add reference to System.Windows.Forms assembly to be able to use System.Windows.Forms.MessageBox.Show.
Provide a clearer message where possible
Create a
try ... catch(...) ...block around thexmlDocument.Save(xmlFilename)statement.Provide a describing message in the catch block.
        try
        {
            xmlDocument.Save(xmlFilename);
        }
        catch(Exception exception)
        {
            System.Windows.Forms.MessageBox.Show(
                string.Join(Environment.NewLine,
                    string.Format("Failed to write XML to file '{0}':", xmlFilename),
                    exception.Message));
            return false;
        }
How to filter out unnecessary objects
Usually it's useful to skip some objects when exporting to an XML file. One of the most common scenarios is to omit objects that represent constraints and decoration.
The following sample shows how to filter out all the objects coming from
SYSTEM catalog (like walls and dimensions), and from all the catalogs whose
filenames start with @ sign, which usually contain constraints, decorative
elements, technical symbols and so on).
After the
foreach (Scene.Object obj in scene.Objects)line place the followingifstatement:foreach (Scene.Object obj in scene.Objects) { if(obj.CatalogFilename == "SYSTEM" || obj.CatalogFilename.StartsWith("@")) continue;
Other useful hints
You can check whether the object is shown in the estimate or not with the IsQuoted property:
            // Skips objects that aren't listed in the estimate.
            if(!obj.IsQuoted)
                continue;
You can check whether the object is hidden or not with IsHidden property
            // Skips hidden objects
            if(obj.IsHidden)
                continue;
You can process only selected objects by iterating on Scene.Selection property instead of Scene.Objects:
        //Exports only selected Objects
        foreach(Scene.Object obj in scene.Selection)
        {
            //...
        }
How to group objects by headings, suppliers, etc.
To group objects by headings iterate headings, then objects:
        //Exports each heading
        foreach(Scene.Heading heading in scene.Headings)
        {
            // Creating and filling a node for each heading
            //...

            foreach(Scene.Object obj in heading.Objects)
            {
                // Creating and filling a node for each object
                //of the heading here
                //...
            }
        }
To group objects by suppliers, you can iterate on either Scene.ObjectsBySupplier, or Scene.ObjectsBySupplierFactorized.
        // Exports objects grouped by suppliers
        foreach (var kvp in scene.ObjectsBySupplier)
        {
            // kvp.key holds the supplier:
            Appli.Supplier supplier = kvp.Key;

            // Creating and filling a node for each heading
            //...

            // kvp.value holds the objects for the supplier:
            IList<Scene.Object> objects = kvp.Value;

            foreach(Scene.Object obj in objects)
            {
                // Creating and filling a node for each object of the heading here
                //...
            }
        }
How to define custom ordering for the objects in the XML file
Because every collection provided by the SDK2 implements
IEnumerable<Scene.Object> collection, you can use extension methods from the
System.Collection.Generic.Enumerable
The following example sorts the objects being exported in the ascending order of their height, then by name:
        var objectsSorted = scene.Objects.OrderBy(obj => obj.Height).ThenBy(obj => obj.Name)

        foreach(Scene.Object obj in objectsSorted)
        {
Please don't forget to insert the using System.Linq; directive to the top of the file:
using System.Linq;
The source code
You can download the Plugin.cs file developed in this lesson from here.