Create your first plugin: Hello World
This example walks you through creating your first plugin for KitchenDraw. The tutorial shows you how to add a new item to the KitchenDraw main menu and handle its invocation.
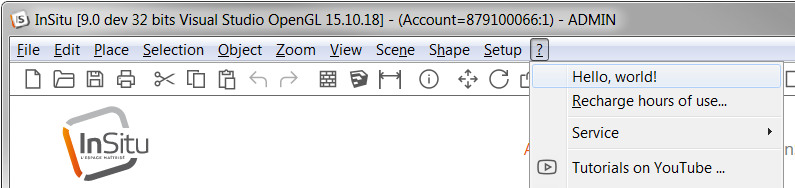
For this example, you'll create a plugin in Visual C# to add a custom menu item that looks like this:
Prerequisites
Before you start, make sure that you have the following installed on your computer:
- KitchenDraw / InSitu;
- Visual Studio (any edition), configured to support C# and .NET Framework development.
Create a plugin project
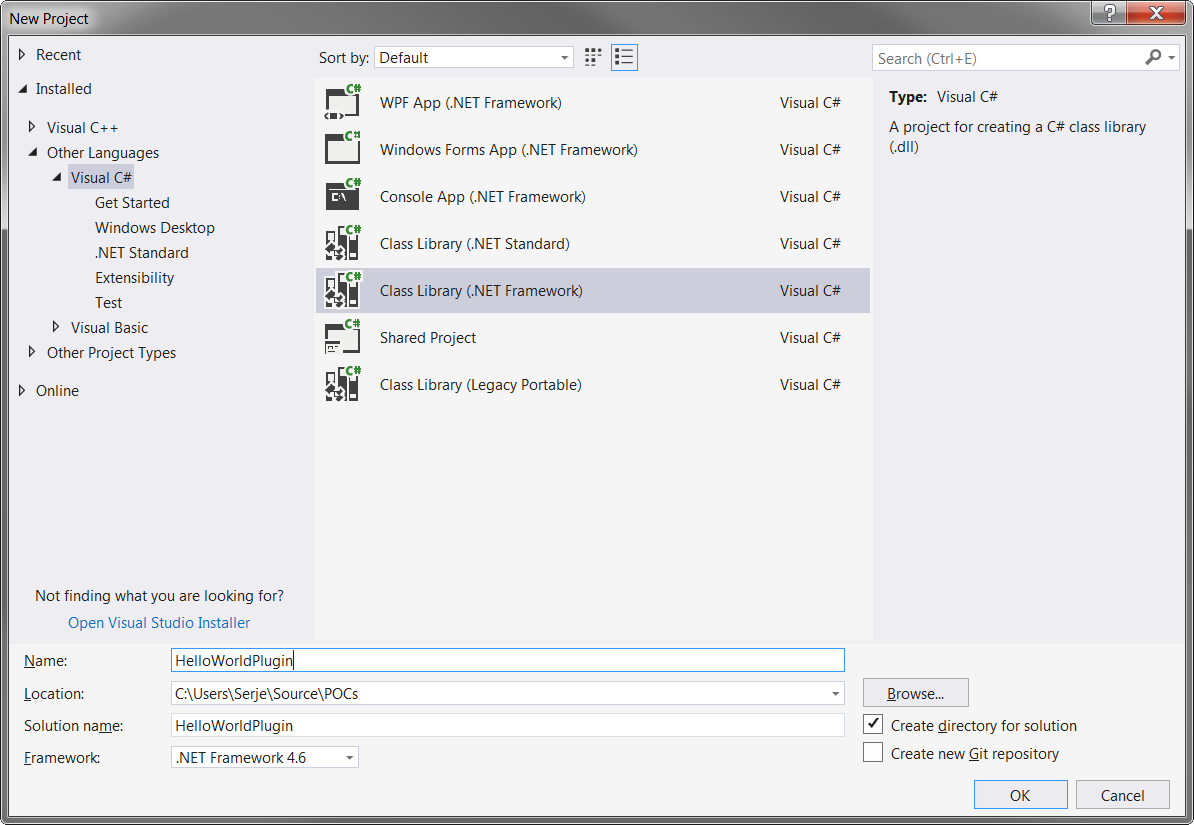
From the File menu, click New > Project. At the bottom of the dialog window, enter a name for your project. We use
HelloWorldPluginname in this tutorial.In the upper left part of the dialog, choose Visual C# templates, and then choose Class Library (.NET Framework) in the upper right part.
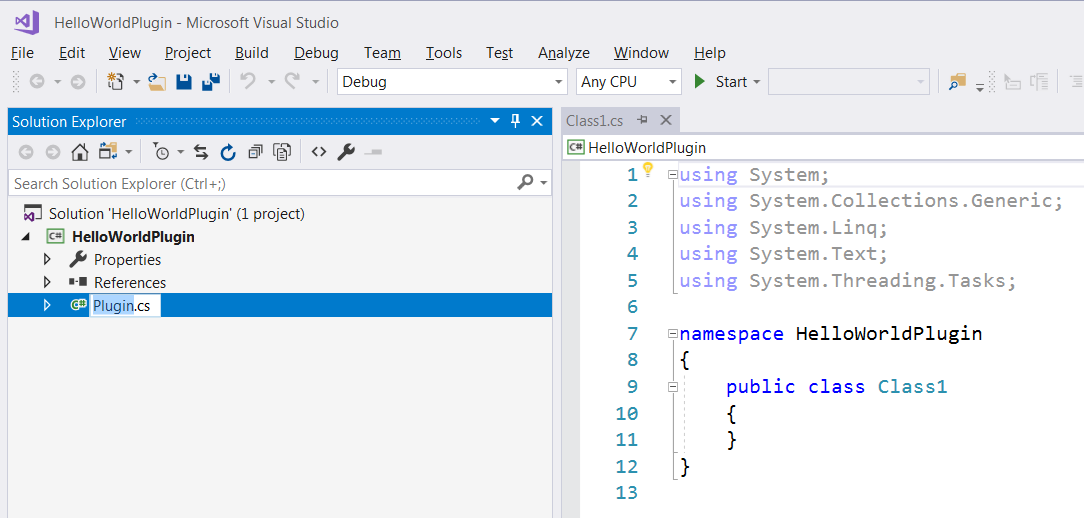
After pressing OK in the dialog, you should see Class1.cs file of your new project.
Define the Plugin class
Rename Class1.cs to Plugin.cs.
- On newer versions of Visual Studio, you'll get the You are renaming a file prompt, offering you to rename the class contained inside as well. Click Yes.
- If no prompt has appeared, rename your Class1 to Plugin inside the file manually.
Note
For the KitchenDraw plugins, a public class named Plugin must exist, and
its namespace must necessarily match the name of the assembly file
(without a path and the .dll extension).
Add a reference to the KD.SDK2.dll
Add a reference to the KD.SDK2.dll assembly.
- In Solution Explorer, right click the References node and click Add Reference.
- In the Add Reference dialog box, select the Browse tab.
- In the bottom the the dialog box, press Browse button.
- In the appeared dialog box locate the KD.SDK2.dll in the folder of your KitchenDraw / InSitu installation. Then press OK.
In the upper part of your Plugin.cs file, insert
using KD.SDK2;directive.using KD.SDK2;On the top of your
Pluginclass, add theAppli _appli;field.Define the
public Plugin()class constructor, and initialize the_applifield in it like that:public class Plugin { Appli _appli; public Plugin() { _appli = new Appli(); } }The
_appliinstance of theAppliclass will internally establish a connection to a running KitchenDraw instance. This allows you to access all the features of the KitchenDraw SDK from your plugin.
Add OnPluginLoad, OnPluginUnload event handlers
Define the
OnPluginLoadmethod to thePluginclass like following:public bool OnPluginLoad(int unused) { return true; }This method is called by the KitchenDraw / InSitu software automatically when the plugin is loaded. The return value should indicate whether the load was OK or not. The
intparameter isn't in use for now.You'll add some useful code to the method a bit later.
Define the
OnPluginUnloadmethod to the Plugin class — in the same manner:public bool OnPluginUnload(int unused) { return true; }As the names suggest, these two methods allow to perform some actions on the plugin loading and unloading. One of the most common actions here — adding a custom menu item — is described next.
Add your custom menu item handler
This sample uses
MessageBoxclass from theSystem.Windows.Formsassembly.- In Solution Explorer, right click the References node and click Add Reference.
- In the Add Reference dialog box, select the Assemblies tab.
- Check System.Windows.Forms assembly in the list. Press OK.
Add
usingdirective in the top of the Plugin.cs for theSystem.Windows.Formsnamespace:using System.Windows.Forms;Add
OnMyMenuItempublic method to thePluginclass:public bool OnMyMenuItem(int unused) { MessageBox.Show("Hello, world!"); return true; }This will be your custom menu item handler - a method which is called when a user clicks your item in the KitchenDraw / InSitu menu.
While
OnPluginLoadandOnPluginUnloadmethod names are required to be like they are by the KitchenDraw plugin subsystem,OnMyMenuItemname was chosen arbitrarily. You can use any other name that you like for the method.
Register your menu item
Add
Appli.MenuItem _myMenuItemfield on the top of the Plugin class.public class Plugin { Appli _appli; Appli.MenuItem _myMenuItem;In the
OnPluginLoadmethod, fill in the information about your menu item. Then register it with theAppli.InsertMenuItemcall:public bool OnPluginLoad(int unused) { var menuInfo = new Appli.MenuItemInsertionInfo(); menuInfo.Text = "Hello, world!"; menuInfo.DllFilenameWithoutPath = Path.GetFileName(Assembly.GetExecutingAssembly().Location); menuInfo.ClassName = nameof(Plugin); menuInfo.MethodName = nameof(OnMyMenuItem); _myMenuItem = _appli.InsertMenuItem(menuInfo, Appli.MenuItem.StandardId.Help_LoadHours); return true; }The
Appli.InsertMenuItemmethod adds a custom menu item to the KitchenDraw menu and returns anAppli.MenuIteminstance to manage it. The instance is saved in the_myMenuItemfield of thePluginclass since you'll need it to remove your menu item as soon as the plugin unloads.The code above uses
Assembly.GetExecutingAssemblyfrom theSystem.Reflectionnamespace andPath.GetFileNamefromSystem.IOto get the name of assembly which contains the plugin. Add theusings for the namespaces in the top of the Plugin.cs file:using System.IO; using System.Reflection;Add code to remove your menu item to the
OnPluginUnloadmethod.public bool OnPluginUnload(int unused) { _appli.RemoveMenuItem(_myMenuItem); return true; }
Configure build and debug options
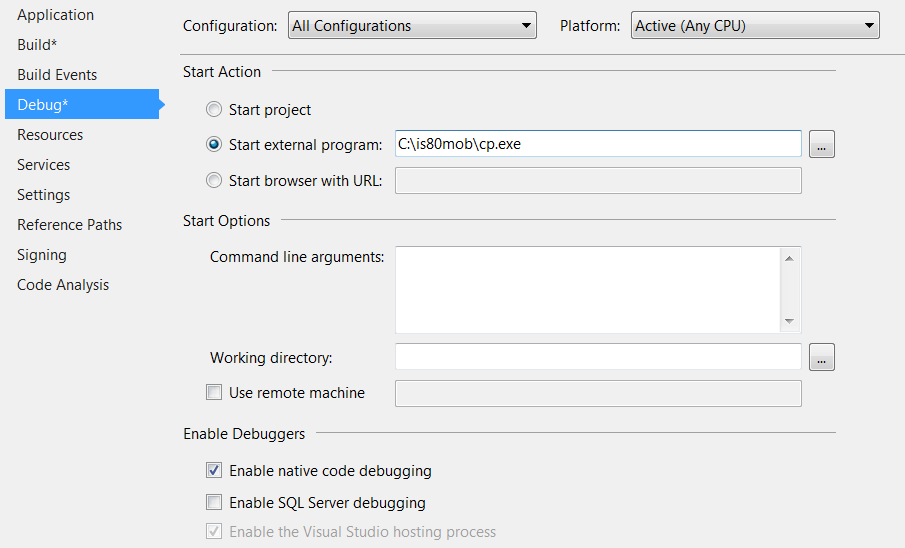
In Solution Explorer, right click the project node and click Properties.
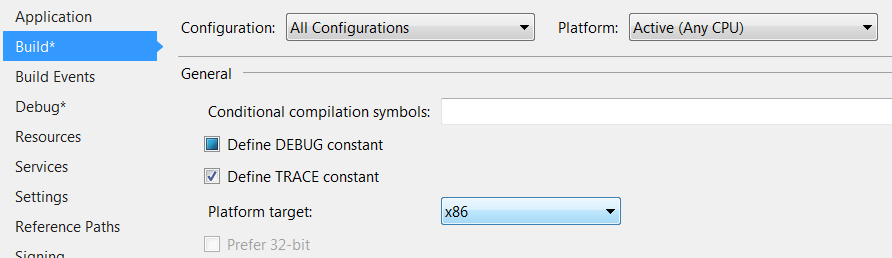
Click on Build tab, choose All Configurtions for Configuration, and choose x86 for Platform Target.
Click on Debug tab, and in Start Action section choose Start external program. To the corresponding textbox, set the path to the kd_app.exe / cp.exe file in your KitchenDraw / InSitu installation folder.
Set Enable native code debugging flag.
Compile your plugin
Select Build > Build Solution menu item to compile your plugin.

Run
Select Debug > Start debugging menu item.
Wait until KitchenDraw / InSitu application starts.
Register your plugin in KitchenDraw / InSitu
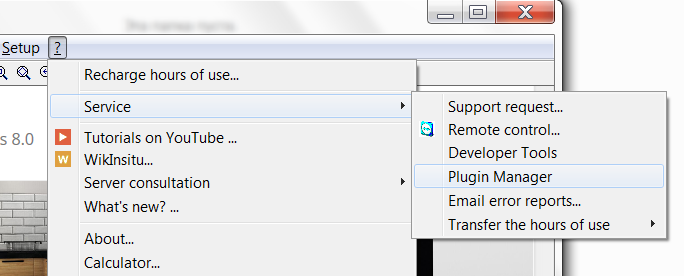
Select ? > Service > Plugin Manager menu item.
In the appeared window, click Open icon from the toolbar
Locate your plugin assembly in the appeared dialog box. Press OK.

Your plugin is loaded now. Click Save button in the toolbar if you want your plugin to be loaded automatically next time KitchenDraw / InSitu starts.
You can load/unload your plugin by clicking the checkbox on the left of its name.
Debug your plugin
Set keyboard cursor to the first row of the
OnMyMenuItemmethod and press F9.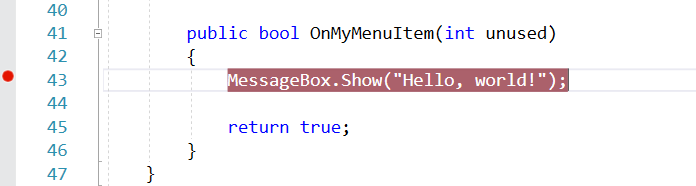
This should set a breakpoint.
Run your plugin project with Debug > Start debugging menu item (if it's not running yet).
Choose ? > Hello, world! menu item.
Now your Visual Studio debugger should stop on the breakpoint:

This way, you can examine the execution flow of your plugin methods, inspect the values of variables and fields at runtime, and even influence program execution with certain limits. You can read more about debugging in Visual Studio at Microsoft Docs.
Next steps
This walkthrough showed you how to:
- Create a plugin project.
- Handle plugin loading and unloading.
- Add a custom command to menu.
- Compile, register a plugin in KitchenDraw / InSitu, and run it.
- Debug a plugin.
The full source code of the Plugin.cs file can be found here.
Now that you know the basics of creating plugins, you can read material about implementing more specific howtos: